Pinterest Challenge: DIY Subway Sign
Happy Tuesday everyone! Well, it’s been exactly one week since I accepted The Pinterest Challenge, and I must say I am SO glad I did!
I have always loved the look of the vintage subway signs, and I’ve googled umpteen tutorials on how to make them on the cheap. But most ofthem involved getting your design enlarged at somewhere like Kinko’s and then using contact paper to transfer it and create your own stencil, of sorts…and honestly, I was just too lazy to do that.
So when I came across this picture on Pinterest the other day, the wheels started turning in my head and I just knew I had found an easier way to make my own subway sign.
 via Pinterest
I quickly decided this would make the perfect project to take on for this challenge. I headed out to Hobby Lobby and picked up my supplies: a 12″x24″ canvas, and some vinyl stick-on letters (in both 2″ and 3″ sizes). Gotta love a project that involves minimal supplies.
I wanted the canvas to have a bit of a worn, weathered look so I started off by glazing it. I had no clue if this would work or not, and initally I thought it gave me a pretty good result, but by the time it was all said and done you couldn’t even tell I had done it in the beginning. Oh well.
After I glazed it, I drew out a little diagram to give me an idea of how far to space things apart, etc.
I know, I know. I’m an awesome diagram drawer. It’s a gift.
Then I drew out my lines with a ruler so I could be sure my letters were in a straight line.
 Notice the glaze? Too bad it was basically nonexistent at the end.
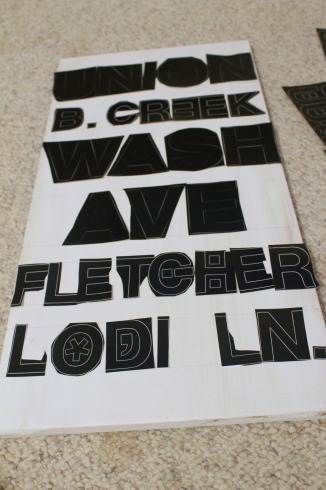
And as if that wasn’t enough planning, I then cut out all my letters and laid them out on my canvas to make sure I liked the placement. A dry run, if you will.
 Looks like one of those ransom notes made from cut out magazine letters, right?
Then came the scary part: sticking the letters on. Even though I knew I could easily peel them up if I placed them crooked or something, I was still borderline sweating while doing this. I need to go to DIY Worrywart Anonymous. After I had them all stuck on there, I whipped out my brown spray paint and got to work.
I originally thought that I would use latex or acrylic paint like they do in the tutorial I pinned, but the adhesive on the letters wasn’t exactly strong and I had visions of the letters moving all over the canvas when I brushed over them with a paintbrush. Oh Lord..I’m sweating again. So, I decided on spray paint and it was kind of a happy accident.
As I was spraying, I held the can back a little farther than I normally would (maybe 12 inches) and moved my hand around faster than I normally would. It created kind of a cool effect where the paint is uneven..lighter in some places, darker in others. It adds to the vintage vibe.
I waited about 30 minutes and then peeled up the letters and let it dry overnight. The next day, I roughed up the canvas just slightly with a sanding block, just so it didn’t have that ‘freshly painted’ look. Then I stuck a couple of Command strips on the back and hung it on the wall.
 Ignore my barely-styled shelves. They need help.
I can’t even tell you how happy I am with how this turned out! And in case you’re wondering, the street names on the sign are all streets that hold meaning for Jordan and I (where we met, first kiss, etc.). I am beyond thrilled to add this personal piece of art to our collection 🙂


Ceara Sluis replied:
i love this sign!!! super cute 🙂 i do believe i might have to attempt trying this sometime soon! keep the blogs coming! i’m enjoying reading all of it!
August 8, 2011 at 12:00 am. Permalink.
jdparnell replied:
Thanks!
August 8, 2011 at 10:58 am. Permalink.
Beth replied:
I discovered you through YHL, and am glad I did – your project is gorgeous!The subway sign was next on my list of Pinterest projects and I’m glad I read your blog before I started mine – I really like your tactic of holding the spray can far away, because it looks great. Nice work!
August 3, 2011 at 11:17 am. Permalink.
Leslie Davison replied:
You did a great job! I love it!
August 3, 2011 at 10:34 am. Permalink.
Whitney replied:
LOVE IT! Awesome job, Dacia! I love that it’s meaningful streets – I’ve seen the ones where people use streets that they have lived on, but never streets where significant events happened. Such a good idea! I bet you guys smile every time you see it. 🙂
August 2, 2011 at 10:33 pm. Permalink.
Staci replied:
Cute idea using memorable street names 😉
August 2, 2011 at 9:20 pm. Permalink.